The main concept of instant bank transfers is the Checkout Session. Create a new Checkout Session for each payment attempt of your customer. Each Checkout Session returns aDocumentation Index
Fetch the complete documentation index at: https://docs.getivy.de/llms.txt
Use this file to discover all available pages before exploring further.
redirectUrl where users go to complete the payment.
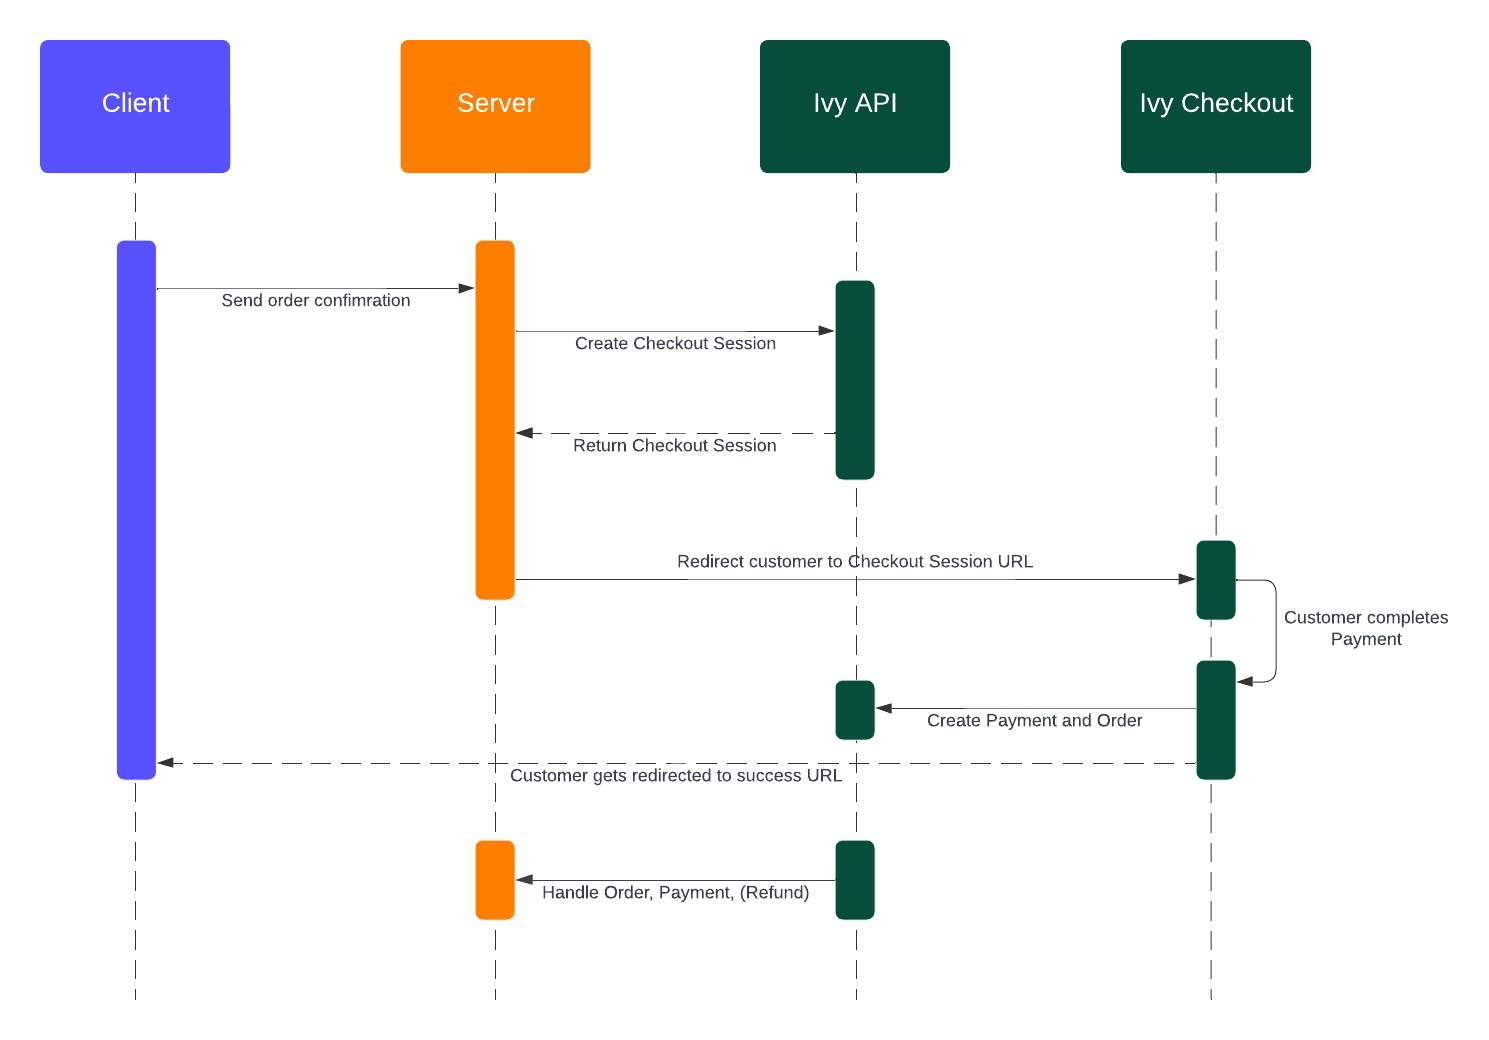
High Level Flow
- Create a Checkout Session: Submit the relevant payment parameters to initiate a checkout session and receive a unique
redirectUrl. - Redirect the User to Ivy: Use the
redirectUrlto send users to the Ivy-hosted bank selection and payment confirmation screen flow. - Return to Your Environment: After the user completes the payment at their bank, they will be redirected back to your site/application to complete their journey.
- Status Tracking: Configure webhooks to receive real-time payment updates, including settlement of the payment to your Ivy collection account.
1. Creating a Checkout Session
Basic Request Parameters
To create a CheckoutSession, send a POST request to the Create a CheckoutSession endpoint. Here are the essential parameters needed:The price object containing the payment amount and currency.
A unique reference ID, typically your internal payment ID.
The URL where customers are redirected after successful payment completion.
The URL where customers are redirected if they close or cancel the Checkout.
Example Payload
Response Fields
The API response includes these key fields:The URL where you should redirect your user to complete payment.
A unique Ivy identifier for this checkout session.
Your provided reference ID, useful for tracking the transaction in your
system.
For a complete list of Parameters, please check out the API
Reference
2. Redirect the User to Ivy
After receiving the API response, redirect your user to theredirectUrl. They’ll complete their payment in the Ivy Checkout interface.
iFrame
You can embed Ivy as an iFrame in your page. Check out the Client Integration guide for more.React SDK
We offer a React SDK for your client integration. Check out the README for usage instructions.3. Return to Your Environment
You will receive them back at thesuccessCallbackUrl or errorCallbackUrl after the payment is completed or cancelled.
Customers are redirected with these query parameters attached to the success or error callback URL you defined when creating the checkout session:
Your original reference ID from checkout creation.
The Ivy order ID (only included for successful payments)
Indicates whether the user explicitly closed the Ivy checkout using the ‘X’ -> ‘Yes, cancel’ flow.
When
user_closed is true, you can optionally expire the checkout session using the Expire a Checkout Session endpoint. This triggers webhooks which can be used update your internal status accordingly.4. Status Tracking
When a customer completes payment successfully:- The
checkoutSessionstatus is set to closed - A new
orderobject is created containing:- All fields from the original
checkoutSession - An additional
statusfield tracking payment progress
- All fields from the original
Set up Webhooks to receive real-time status updates. See Payment Status for details on possible payment journeys and statuses.
Settlement
When Ivy holds a collection account for you, you will also be able to receive apaid status when payments have settled.
Learn more in Accounts.
Recommended Checkout Session Creation
As the core concept of instant bank transfers your checkout session creation requests are key to optimise your users experience. Using the below configurations can help optimise the speed, available banks, and user journey.Payment Scheme Selection
Ivy is connected to all instant payment rails in each country, e.g. SEPA Instant for EUR, Faster Payments for GBP. Some banks charge their customers fees for using instant bank transfers. Ivy always uses the instant payment rail available for each bank if there are no fees charged to customers. You can enforce to always use the instant payment rail via the API Control the speed vs. cost tradeoff of payments:instant_only: Use only instant payment railsinstant_preferred: Prioritize instant payment rails but allow fallback to standardstandard: Use only standard (free but slower) rails
If not specified, the default scheme is determined by your application configuration. Speak to your account manager to change this.
Default Market Selection
Set the default market that will appear to users in the bank selection screen. Always pre-select the most relevant market for your customers.ISO 3166-1 alpha-2 country code (e.g., “DE” for Germany, “GB” for United Kingdom). When provided, the checkout will display banks from this market first. If not provided, Ivy will automatically detect the market based on the user’s IP address.
The market parameter is not relevant if you’re using
prefill.bankId to pre-select a specific bank for the customer.Customer Object
Provide data to enable the Remember Me feature to give a smoother journey for returning users. Provide either the email address or the pre-defined customer id.Customer information to enable the Remember Me feature.
Customer’s email address. Used for customer recognition and to enable the Remember Me feature.
Pre-defined customer ID from Ivy. Use this if you’ve already created a customer via the Customer API.